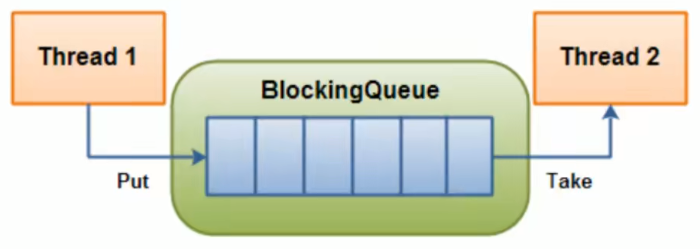
# 阻塞队列接口结构和实现类阻塞队列 ,顾名思义,首先它是一个队列,而一个阻塞队列在数据结构中所起的作用大致如下图所示:
线程 1 往阻塞队列中添加元素,而线程 2 从阻塞队列中移除元素。
当阻塞队列是空时,从队列中获取元素的操作将会被阻塞。
当阻塞队列是满时,往队列里添加元素的操作将会被阻塞。
试图从空的阻塞队列中获取元素的线程将会被阻塞,直到其他的线程往空的队列插入新的元素。
同样试图往已满的阻塞队列中添加新元素的线程同样也会被阻塞,直到其他的线程从列中移除一个或者多个元素或者完全清空队列后使队列重新变得空闲起来并后续新增
为什么用?有什么好处?
在多线程领域:所谓阻塞,在某些情况下余挂起线程(即阻塞),一旦条件满足,被挂起的线程又会自动被唤醒
为什么需要 BlockingQueue BlockingQueue 都给你一手包办了
在 Concurrent 包发布以前,在多线程环境下,我们每个程序员都必须去自己控制这些细节,尤其还要兼顾效率和线程安全,而这会给我们的程序带来不小的复杂度。
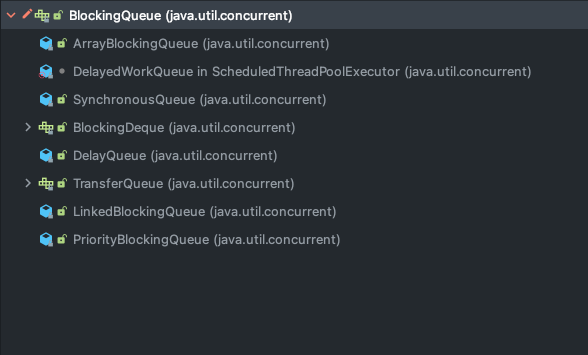
架构介绍
种类分析:
ArrayBlockingQueue :由数组结构组成的有界阻塞队列。LinkedBlockingQueue :由链表结构组成的有界(但大小默认值为 Integer.MAX_VALUE )阻塞队列。PriorityBlockingQueue :支持优先级排序的无界阻塞队列。DelayQueue :使用优先级队列实现妁延迟无界阻塞队列。SynchronousQueue :不存储元素的阻塞队列。LinkedTransferQueue :由链表结构绒成的无界阻塞队列。LinkedBlockingDeque :由链表结构组成的双向阻塞队列。
BlockingQueue 的核心方法
方法类型
抛出异常
特殊值
阻塞
超时
插入
add(e)
offer(e)
put(e)
offer(e,time,unit)
移除
remove()
poll()
take()
poll(time,unit)
检查
element()
peek()
不可用
不可用
性质
说明
----
—
抛出异常
当阻塞队列满时:在往队列中 add 插入元素会抛出 IIIegalStateException:Queue full 当阻塞队列空时:再往队列中 remove 移除元素,会抛出 NoSuchException
特殊性
插入方法,成功 true,失败 false 移除方法:成功返回出队列元素,队列没有就返回空
一直阻塞
当阻塞队列满时,生产者继续往队列里 put 元素,队列会一直阻塞生产线程直到 put 数据 or 响应中断退出。 当阻塞队列空时,消费者线程试图从队列里 take 元素,队列会一直阻塞消费者线程直到队列可用。
超时退出
当阻塞队列满时,队里会阻塞生产者线程一定时间,超过限时后生产者线程会退出
# 线程通信之生产者消费者传统阻塞队列用在哪里?
生产者消费者模式
传统版( synchronized, wait, notify )
阻塞队列版( lock, await, signal )
线程池
消息中间件
实现一个简单的生产者消费者模式
1
2
3
4
5
6
7
8
9
10
11
12
13
14
15
16
17
18
19
20
21
22
23
24
25
26
27
28
29
30
31
32
33
34
35
36
37
38
39
40
41
42
43
44
45
46
47
48
49
50
51
52
53
54
55
56
class ShareData private int number = 0 ; private Lock lock = new ReentrantLock(); private Condition condition = lock.newCondition(); public void increment () throws Exception lock.lock(); try { while (number != 0 ) { condition.await(); } number++; System.out.println(Thread.currentThread().getName() + "\t " + number); condition.signalAll(); } catch (Exception e) { e.printStackTrace(); } finally { lock.unlock(); } } public void decrement () throws Exception lock.lock(); try { while (number == 0 ) { condition.await(); } number--; System.out.println(Thread.currentThread().getName() + "\t " + number); condition.signalAll(); } catch (Exception e) { e.printStackTrace(); } finally { lock.unlock(); } } }
注意, increment() 和 decrement() 内的
1 2 3 4 5 while (number != 0 ) { condition.await(); }
不能用 (javaw 文档中指出)
1 2 3 4 5 if (number != 0 ) { condition.await(); }
# Synchronized 和 Lock 有什么区别
synchronized 属于 JVM 层面,属于 java 的关键字
monitorenter (底层是通过 monitor 对象来完成,其实 wait/notify 等方法也依赖于 monitor 对象 只能在同步块或者方法中才能调用 wait/ notify 等方法)Lock 是具体类( java.util.concurrent.locks.Lock )是 api 层面的锁
使用方法:
synchronized: 不需要用户去手动释放锁,当 synchronized 代码执行后,系统会自动让线程释放对锁的占用。ReentrantLock: 则需要用户去手动释放锁,若没有主动释放锁,就有可能出现死锁的现象,需要 lock() 和 unlock() 配置 try catch 语句来完成
等待是否中断
synchronized: 不可中断,除非抛出异常或者正常运行完成。ReentrantLock: 可中断,可以设置超时方法
设置超时方法, trylock(long timeout, TimeUnit unit)
lockInterrupible() 放代码块中,调用 interrupt() 方法可以中断
加锁是否公平
synchronized :非公平锁ReentrantLock :默认非公平锁,构造函数可以传递 boolean 值, true 为公平锁, false 为非公平锁
锁绑定多个条件 Condition
synchronized :没有,要么随机,要么全部唤醒ReentrantLock :用来实现分组唤醒需要唤醒的线程,可以精确唤醒,而不是像 synchronized 那样,要么随机,要么全部唤醒
# 锁绑定多个条件 Condition实现场景
多线程之间按顺序调用,实现 A-> B -> C 三个线程启动,要求如下:AA 打印 5 次, BB 打印 10 次, CC 打印 15 次AA 打印 5 次, BB 打印 10 次, CC 打印 15 次10 轮
1
2
3
4
5
6
7
8
9
10
11
12
13
14
15
16
17
18
19
20
21
22
23
24
25
26
27
28
29
30
31
32
33
34
35
36
37
38
39
40
41
42
43
44
45
46
47
48
49
50
51
52
53
54
55
56
57
58
59
60
61
62
63
64
65
66
67
68
69
70
71
72
73
74
75
76
77
78
79
80
81
82
83
84
85
86
87
88
89
90
91
92
93
94
95
96
97
98
99
100
101
102
103
104
105
106
107
108
109
110
111
112
113
114
115
116
117
118
119
import java.util.concurrent.locks.Condition;import java.util.concurrent.locks.Lock;import java.util.concurrent.locks.ReentrantLock;class ShareResource private int number = 1 ; private Lock lock = new ReentrantLock(); private Condition condition1 = lock.newCondition(); private Condition condition2 = lock.newCondition(); private Condition condition3 = lock.newCondition(); public void print5 () lock.lock(); try { while (number != 1 ) { condition1.await(); } for (int i = 0 ; i < 5 ; i++) { System.out.println(Thread.currentThread().getName() + "\t " + number + "\t" + i); } number = 2 ; condition2.signal(); } catch (Exception e) { e.printStackTrace(); } finally { lock.unlock(); } } public void print10 () lock.lock(); try { while (number != 2 ) { condition2.await(); } for (int i = 0 ; i < 10 ; i++) { System.out.println(Thread.currentThread().getName() + "\t " + number + "\t" + i); } number = 3 ; condition3.signal(); } catch (Exception e) { e.printStackTrace(); } finally { lock.unlock(); } } public void print15 () lock.lock(); try { while (number != 3 ) { condition3.await(); } for (int i = 0 ; i < 15 ; i++) { System.out.println(Thread.currentThread().getName() + "\t " + number + "\t" + i); } number = 1 ; condition1.signal(); } catch (Exception e) { e.printStackTrace(); } finally { lock.unlock(); } } } public class SynchronizedAndReentrantLockDemo public static void main (String[] args) ShareResource shareResource = new ShareResource(); int num = 10 ; new Thread(() -> { for (int i = 0 ; i < num; i++) { shareResource.print5(); } }, "A" ).start(); new Thread(() -> { for (int i = 0 ; i < num; i++) { shareResource.print10(); } }, "B" ).start(); new Thread(() -> { for (int i = 0 ; i < num; i++) { shareResource.print15(); } }, "C" ).start(); } }
输出结果:
1
2
3
4
5
6
7
8
9
10
11
12
13
14
15
16
17
18
19
20
21
22
23
24
25
26
27
28
29
30
31
32
33
34
35
36
37
38
39
40
41
42
43
44
45
46
47
48
49
50
51
52
53
54
55
56
57
58
59
60
61
... A 1 0 A 1 1 A 1 2 A 1 3 A 1 4 B 2 0 B 2 1 B 2 2 B 2 3 B 2 4 B 2 5 B 2 6 B 2 7 B 2 8 B 2 9 C 3 0 C 3 1 C 3 2 C 3 3 C 3 4 C 3 5 C 3 6 C 3 7 C 3 8 C 3 9 C 3 10 C 3 11 C 3 12 C 3 13 C 3 14 A 1 0 A 1 1 A 1 2 A 1 3 A 1 4 B 2 0 B 2 1 B 2 2 B 2 3 B 2 4 B 2 5 B 2 6 B 2 7 B 2 8 B 2 9 C 3 0 C 3 1 C 3 2 C 3 3 C 3 4 C 3 5 C 3 6 C 3 7 C 3 8 C 3 9 C 3 10 C 3 11 C 3 12 C 3 13 C 3 14
# 线程通信之生产者消费者阻塞队列版1 2 3 4 5 6 7 8 9 10 11 12 13 14 15 16 17 18 19 20 21 22 23 24 25 26 27 28 29 30 31 32 33 34 35 36 37 38 39 40 41 42 43 44 45 46 47 48 49 50 51 52 53 54 55 56 57 58 59 60 61 62 63 64 65 66 67 68 69 70 71 72 73 74 75 76 77 78 79 80 81 82 83 84 85 86 87 88 89 90 91 92 93 94 95 96 97 98 99 100 101 102 103 104 105 106 107 108 109 110 111 112 113 114 115 116 117 118 import java.util.concurrent.ArrayBlockingQueue;import java.util.concurrent.BlockingQueue;import java.util.concurrent.TimeUnit;import java.util.concurrent.atomic.AtomicInteger;class MyResource private volatile boolean FLAG = true ; private AtomicInteger atomicInteger = new AtomicInteger(); BlockingQueue<String> blockingQueue = null ; public MyResource (BlockingQueue<String> blockingQueue) this .blockingQueue = blockingQueue; System.out.println(blockingQueue.getClass().getName()); } public void myProducer () throws Exception String data = null ; boolean retValue; while (FLAG) { data = atomicInteger.incrementAndGet() + "" ; retValue = blockingQueue.offer(data, 2L , TimeUnit.SECONDS); if (retValue) { System.out.println(Thread.currentThread().getName() + "\t 插入队列:" + data + "成功" ); } else { System.out.println(Thread.currentThread().getName() + "\t 插入队列:" + data + "失败" ); } try { TimeUnit.SECONDS.sleep(1 ); } catch (InterruptedException e) { e.printStackTrace(); } } System.out.println(Thread.currentThread().getName() + "\t 停止生产,表示FLAG=false,生产介绍" ); } public void myConsumer () throws Exception String retValue; while (FLAG) { retValue = blockingQueue.poll(2L , TimeUnit.SECONDS); if (retValue != null && retValue != "" ) { System.out.println(Thread.currentThread().getName() + "\t 消费队列:" + retValue + "成功" ); } else { FLAG = false ; System.out.println(Thread.currentThread().getName() + "\t 消费失败,队列中已为空,退出" ); return ; } } } public void stop () this .FLAG = false ; } } public class ProducerConsumerWithBlockingQueueDemo public static void main (String[] args) MyResource myResource = new MyResource(new ArrayBlockingQueue<String>(10 )); new Thread(() -> { System.out.println(Thread.currentThread().getName() + "\t 生产线程启动\n\n" ); try { myResource.myProducer(); System.out.println("\n" ); } catch (Exception e) { e.printStackTrace(); } }, "producer" ).start(); new Thread(() -> { System.out.println(Thread.currentThread().getName() + "\t 消费线程启动" ); try { myResource.myConsumer(); } catch (Exception e) { e.printStackTrace(); } }, "consumer" ).start(); try { TimeUnit.SECONDS.sleep(5 ); } catch (InterruptedException e) { e.printStackTrace(); } System.out.println("\n\n5秒中后,生产和消费线程停止,线程结束" ); myResource.stop(); } }
输出结果:
1
2
3
4
5
6
7
8
9
10
11
12
13
14
15
16
17
18
19
20
21
22
java.util.concurrent.ArrayBlockingQueue producer 生产线程启动 consumer 消费线程启动 producer 插入队列:1 成功 consumer 消费队列:1 成功 producer 插入队列:2 成功 consumer 消费队列:2 成功 producer 插入队列:3 成功 consumer 消费队列:3 成功 producer 插入队列:4 成功 consumer 消费队列:4 成功 producer 插入队列:5 成功 consumer 消费队列:5 成功 5 秒中后,生产和消费线程停止,线程结束producer 停止生产,表示FLAG=false ,生产介绍 consumer 消费失败,队列中已为空,退出

